The PIC CPU contains software that performs the following functions:
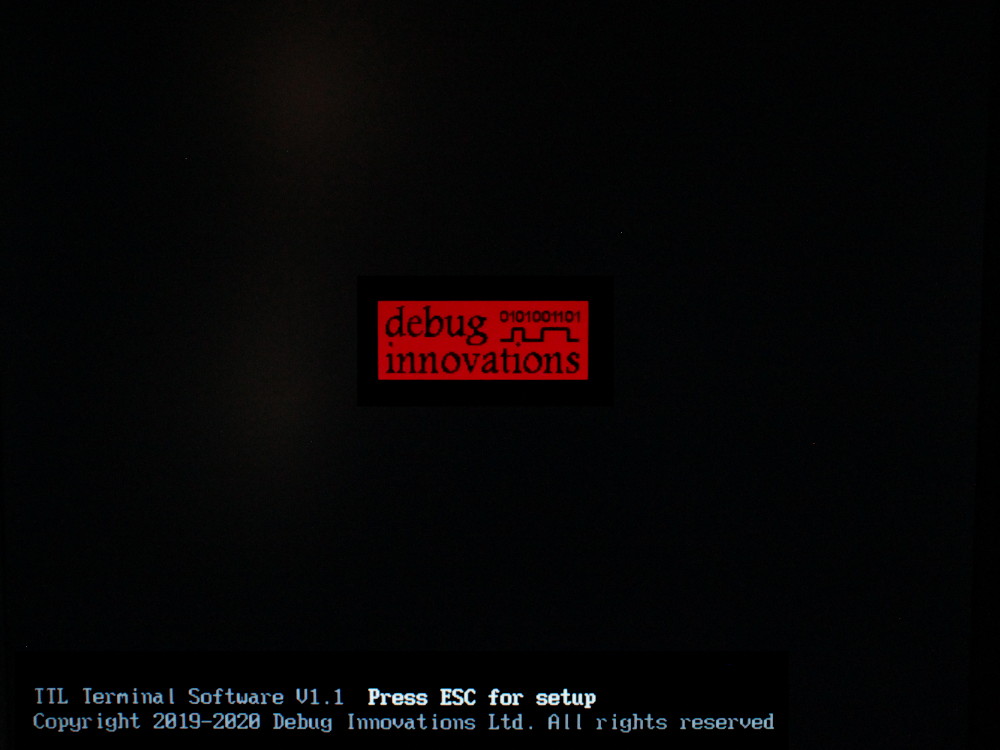
On startup, the following screen will be shown for 5 seconds:
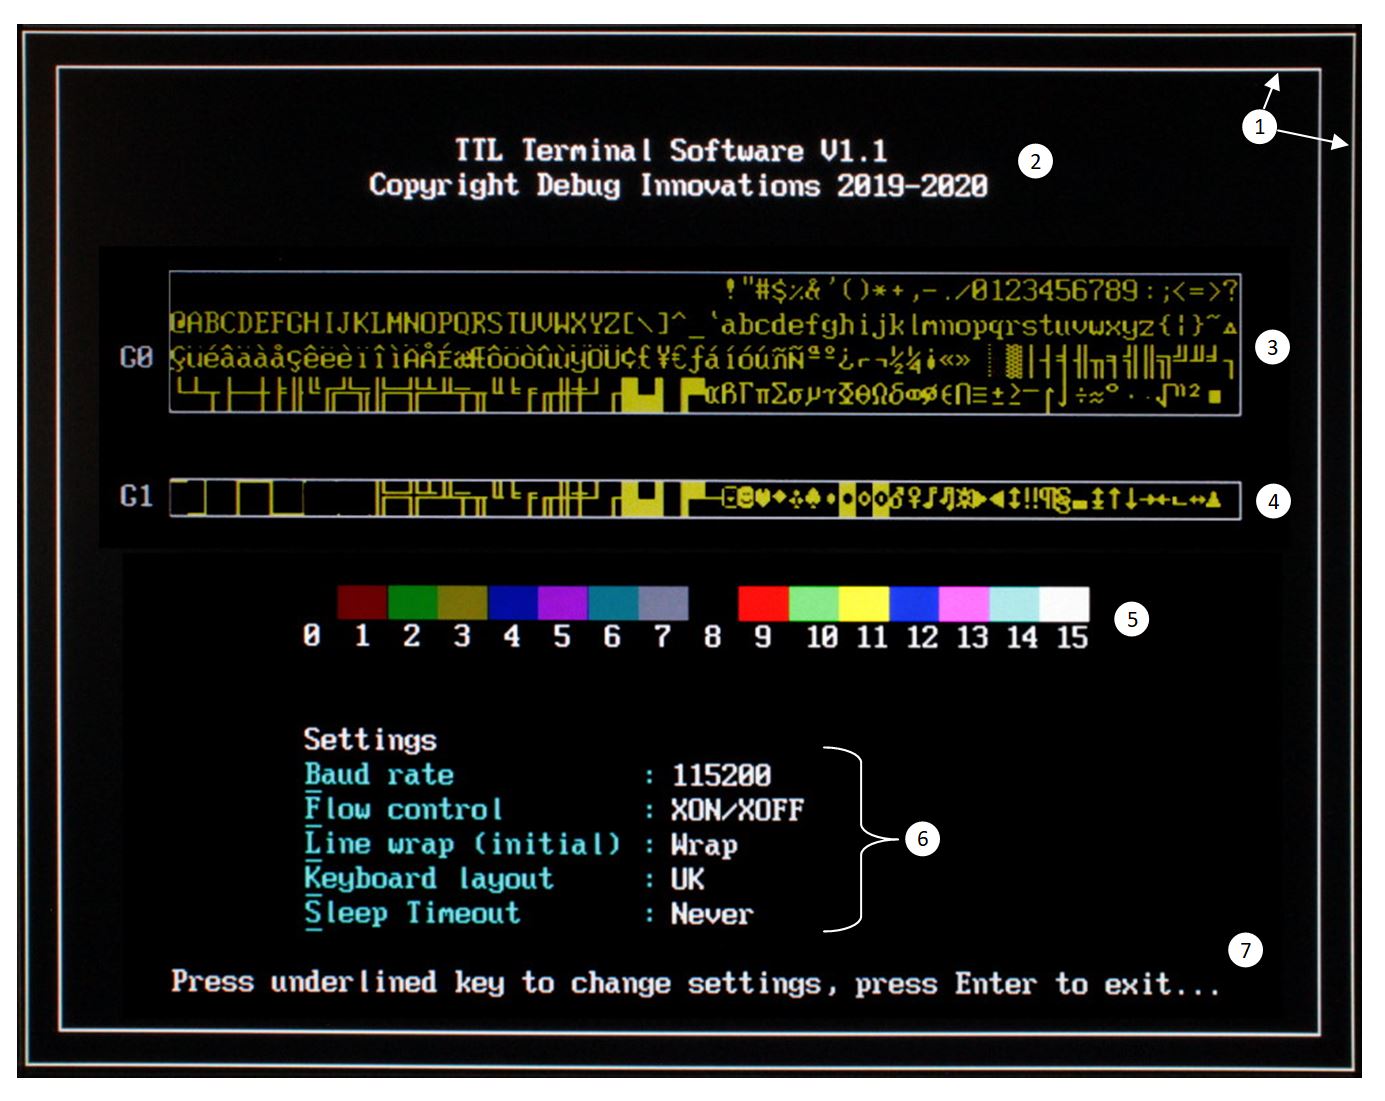
When the escape key is pressed, the settings screen is opened, which looks like this:
| # | Description |
|---|---|
| 1 | Display alignment guides. To be used to calibrate the alignment of the image within the display. The outer box is on the last pixel of the display in every direction and should be entirely visible. The inner box is there to help alignment if the image is scaled incorrectly and none of the outer box is visible. |
| 2 | Title, software version and copyright notice. |
| 3 | G0 character set. These rows display all the symbols for the G0 ASCII set in normal rendering mode. Symbols from 0x00-0x20 are not displayed, because they are control codes. |
| 4 | G1 character set. This row displays all the alternate symbols for the G1 ASCII set in normal rendering mode. Only symbols from 0xC0-0xFF are displayed, which are the standard substituted characters. |
| 5 | Colour pallette. When using the ANSI SGR codes, the colours numbered 0-7 map to codes 30-37 and those numbered 8-15 are the bright equivalents. |
| 6 | System settings. Each possible setting can be cycled through with the underlined key and is saved when Enter is pressed. See the table below for details about each setting. |
| 7 | Instructions |
| Setting | Available Options | Default Value | Description |
|---|---|---|---|
| Baud rate | 1200, 2400, 4800, 9600, 19200, 38400, 57600, 115200, 230400 | 115200 | Serial connection baud rate. Note that higher rates may be problematic without flow control. |
| Flow control | None, XON/XOFF, RTS/CTS | XON/XOFF | Type of flow control used for serial data port. Should be used at higher baud rates. |
| Line wrap (initial) | Wrap, No Wrap | Wrap | Defines the default behaviour when the cursor is at the end of a line and another character is displayed. In 'Wrap' mode the cursor moves to the start of the next line. In 'No Wrap' mode the cursor remains in place at the end of the current line. This is only the default line wrap setting, and can be changed with the escape sequences "ESC [ ? 7 h" (wrap) and "ESC [ ? 7 l" (no wrap). |
| Keyboard layout | UK, US | UK | Layout of PS/2 keyboard currently connected. |
| Sleep timeout | Never, 30 secs, 1 mins, 5 mins, 10 mins, 30 mins, 60 mins | Never | Idle time before the monitor is put into standby. Received characters or keyboard input will wake the monitor. Monitor power can also be controlled with the escape sequence "ESC [ ? 999 h/l" regardless of this setting. |
| Text Colour (initial) | All text colours except black | White | Initial text colour. Text colours can be changed after startup by sending ANSI SGR sequences. This option enables the terminal to mimic old-fashioned green or yellow CRT terminals connected to systems which have no support for ANSI sequences. * |
* From PIC software V1.2 onward (not shown in screenshot above).
The software supports two types of flow control over RS232: XON/XOFF and RTS/CTS. Using flow control is strongly recommended as the terminal may not be able to keep up with the incoming data when performing certain functions such as scrolling the screen and this would lead to lost characters without flow control.
Note that flow control is only supported for the display data direction. Keyboard data being transmitted on the serial line has no flow control. This is because the amount of keyboard data sent is very low and there is no CTS line.
If you want to use XON/XOFF but don't need a keyboard, the RX line is still required. This is because the XON and XOFF characters still need to be received by the connected serial device. Also, some control codes generate a response for which the RX line is required e.g. the Echo request and Firmware Version request.
Matching flow control settings must also be set at the computer end of the interface and, if using RTS/CTS, the RTS line must also be connected (many serial cables do not have all the pins wired).
The software supports many commonly used control and escape codes including the ones used by Linux terminals. For more information on ANSI escape sequences, read the following wikipedia article.
The following codes are supported. All other codes below 0x20 are ignored.
| Hex | ASCII Name | Description |
|---|---|---|
| 0x01 | SOH | Home - cursor goes to the top left of the screen * |
| 0x08 | BS | Backspace |
| 0x09 | TAB | Tab (every 8th column) |
| 0x0A | LF | Newline (line feed) |
| 0x0C | FF | Clear screen (form feed) |
| 0x0D | CR | Carriage return |
| 0x0E | SO | Select character set G1 (shift out) |
| 0x0F | SI | Select character set G0 (shift in) |
| 0x11 | DC1 | XON (ignored on reception, transmitted when buffer space becomes available) |
| 0x13 | DC3 | XOFF (ignored on reception, transmitted when buffer becomes full) |
| 0x16 | SYN | Echo - terminal responds by transmitting the same character back to the computer. Echo can be used to test for the presence of a terminal which is ready (powered on and set to the correct baud rate). It can also be used to time drawing operations by adding an Echo character on the end of a drawing request and waiting for the echo response. Echo has no visible effect except for waking the terminal if it is in a sleep state. * |
| 0x1B | ESC | Escape, starts the ANSI sequences listed below |
* From PIC software V1.2 onward.
| Escape code | Description |
|---|---|
| c | Reset to power-on state |
| 7 | Save current cursor/drawing state |
| 8 | Restore saved cursor/drawing state |
| D | Scroll window up one line |
| M | Scroll window down one line |
| n ( | Set G0 character set to n |
| n ) | Set G1 character set to n |
These are all common sequences which are widely used by software with built-in support for terminals such as Linux. In the table n and m are numbers which follow ESC[ and the final letter indicates the function. The whole string must be sent with no spaces e.g. "ESC[1A" to move the cursor up one character.
| Escape code | Description |
|---|---|
| n @ | Insert n blank characters (pushing characters on line to the right) |
| n A | Cursor up n characters |
| n B | Cursor down n characters |
| n C | Cursor right n characters |
| n D | Cursor left n characters |
| n E | Move cursor to the start of the line n lines down |
| n F | Move cursor to the start of the line n lines up |
| n G | Move cursor to column n |
| n;m H | Move cursor to position n,m where n is the row and m is the column |
| n;m f | Same as 'H' above |
| n J | Erase in display, for different values of n: when 0 (or missing), clear from cursor to the bottom of the display; when 1, clear from cursor to the top of the display; when 2, clear the entire display |
| n K | Erase in line, for different values of n: when 0 (or missing), clear from cursor to the end of the line; when 1, clear from cursor to the start of the line; when 2, clear the entire line |
| n L | Insert n blank lines below (pushing lines below down) |
| n M | Delete n lines below (pulling up lines below that) |
| n P | Delete n characters at the cursor (pulling the rest of the characters on the line in) |
| n S | Scroll up n lines |
| n T | Scroll down n lines |
| n X | Delete n characters from the cursor position |
| n d | Move cursor to row n |
| n h | Set mode: only supported n is 4, insert mode on |
| n l | Reset mode: only supported n is 4, insert mode off |
| n;m;... m | Set graphic rendition - see SGR section |
| n;m r | Set top and bottom lines of the drawing window |
| s | Save current cursor drawing state |
| u | Restore saved cursor drawing state |
| n ~ | Keyboard keys, for different values of n: 1 = 'home', 2 = 'insert', 3 = 'delete', 4 = 'end' |
The following sequence "ESC [ n;m;... m" lets the user set how the characters are rendered when displayed. It can take many parameters, each seperated by a semicolon. Each parameter sets one aspect of the rendering for the characters drawn after this point. For example, the sequence "ESC[1;4;31m" sets the current style to bright (1) red (31) underlined (4). Characters sent to the terminal after this point will be displayed in the new style.
The following parameters are supported.
| Parameter | Description |
|---|---|
| 0 | Reset style |
| 1 | Bold (bright text colours) |
| 2 | Faint (dark text colours) |
| 4 | Underline on |
| 7 | Reverse video on |
| 24 | Underline off |
| 27 | Reverse video off |
| 30-37 | Set Foreground colour (black, red, green, yellow, blue, magenta, cyan, white) |
| 39 | Default foreground colour |
| 40-47 | Set Background colour (black, red, green, yellow, blue, magenta, cyan, white) |
| 49 | Default background colour |
| Escape code | h Description | l Description |
|---|---|---|
| 7 h/l | Enable wrap-around mode (cursor moves to start of next line when it reaches the end of the current line) | Disable wrap-around mode (cursor stays at the end of the current line when it reaches the end of the line) |
| 25 h/l | Show cursor | Hide cursor |
| 999 h/l | Turn monitor on (exit standby) | Turn monitor off (enter standby) |
| 1000 h/l | Send the Firmware Version Number over the serial port e.g. V1.2 * | Same as h |
| 1047 h/l | Use alternate screen buffer - see Alternate Screen Buffer section below | Use main screen buffer |
| 1048 h/l | Save the current cursor state | Restore the saved cursor state |
| 1049 h/l | Save the current cursor state then switch to the alternate screen buffer | Switch to the main screen buffer and restore the saved cursor state |
| 1111;n h/l | Load custom character bitmap to slot |
Same as h |
| 1201;x;y h/l | Plot a single point in PG mode - see Pseudo-Graphics section below * | Same as h |
| 1202;x1;y1;x2;y2 h/l | Draw a line in PG mode - see Pseudo-Graphics section below * | Same as h |
| 1203;x1;y1;x2;y2 h/l | Draw an open (unfilled) rectangle in PG mode - see Pseudo-Graphics section below * | Same as h |
| 1204;x1;y1;x2;y2 h/l | Draw a filled rectangle in PG mode - see Pseudo-Graphics section below * | Same as h |
| 1205;x;y;r h/l | Draw an open (unfilled) circle of radius r in PG mode - see Pseudo-Graphics section below * | Same as h |
| 1206;x;y;r h/l | Draw a filled circle of radius r in PG mode - see Pseudo-Graphics section below * | Same as h |
| 1250;x;y;rot;ch h/l | Draw a character, ASCII code ch with rotation rot (0-3) in PG mode - see Pseudo-Graphics section below * | Same as h |
| 2000 h/l | Set keyboard to game mode where keyboard scan codes are sent and auto-repeat is off * | Set keyboard to normal mode where the keys are decoded into ASCII characters and held keys auto-repeat. |
| 2100 h/l | Reset mouse coordinates - current mouse position becomes (0, 0) * | Same as h |
| 9047 h/l | Use alternate screen buffer while displaying the main screen buffer - see Alternate Screen Buffer section below | Use main screen buffer while displaying the alternate screen buffer |
| 9049 h/l | Save the current cursor state then switch to the alternate screen buffer while displaying the main screen buffer | Switch to the main screen buffer while displaying the alternate screen buffer and restore the saved cursor state |
| 9147 h/l | As 9047 plus copy the main buffer to the alternate so they start off the same - see Alternate Screen Buffer section below * | As 9047 plus copy the alternate buffer to the main so they start off the same * |
| 9149 h/l | As 9049 plus copy the main buffer to the alternate so they start off the same * | As 9049 plus copy the alternate buffer to the main so they start off the same * |
* From PIC software V1.2 onward.
The character RAM contains two separate screen buffers. Normally only one buffer is written to by incoming characters and that same buffer is visible on the screen - this is known as the main buffer. By using private control sequences, the alternate buffer can be written to and displayed as required. This feature can be used to switch between two 'views' as Linux does when entering/exiting a text editor or be used to make animation smoother by writing to one screen while displaying the other.
Private sequences 1047-1049 are used to switch between the two buffers with the visible buffer always being the same as the buffer being written. It is simply a way of saving the current screen and working on a new screen until the original is required again. These are the codes that Linux uses when it switches between screens. In that sense, they are more like public sequences than private sequences.
Private sequences 9047 & 9049 are used to show one buffer on the screen while writing to the other buffer. This can be used to make animation smoother. Use this when the non-visible screen must be entirely re-drawn each time.
Private sequences 9147 & 9149 are similar to 9047/9049 but they copy the visible buffer to the non-visible buffer at the same time as switching views. This is designed to be used when partial updates have to be performed on the non-visible screen. With partial updates, using 9047/9049 would require applying the changes from the previous screen plus the new screen (2 sets of updates for each screen flip) whereas 9147/9149 automatically acquires the previous screen update and only requires the new changes to be applied on each screen flip.
This design supports up to 64 custom character bitmaps through a custom ANSI command which can be accessed with ASCII codes 32-95 (0x20-0x5F) in the G1 character set.
The example image below shows how an 8x16 image (in this case a lower case Greek 'phi') can be converted into an series of 16 bytes representing it - taking each white pixel as a 0 and each black pixel as a 1.
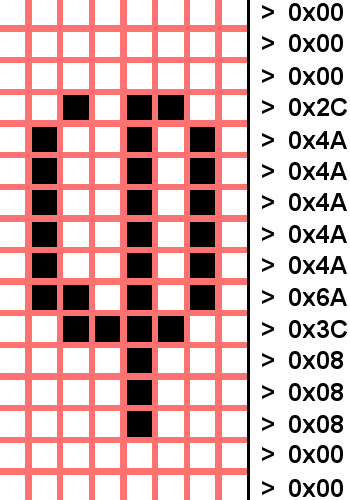
The private CSI sequence "CSI?1111;nh" (where n is the ASCII code) can be used to start loading the character to the selected ASCII position. The next 16 bytes are received as raw data, and then loaded into the font RAM slot. The sequence for loading the example image into the first custom ASCII position (32) looks like this:
| ESC | [ ? 1111 ; 32 h | 0x00 0x00 0x00 0x2C 0x4A 0x4A 0x4A 0x4A 0x4A 0x6A 0x3C 0x08 0x08 0x08 0x00 0x00 |
| Escape | 1111 is the custom character loading code, 32 is the ASCII code that will be used to access this character. | Literal binary. Each byte is one row of the bitmap to load from top to bottom. |
We now have a new character bitmap loaded into the font RAM. Switching into the G1 character set and printing ASCII code 32 will result in our new character being displayed.
The TTL Terminal hardware can only display characters, the hardware does not support true video graphics where any pixel can have any colour. However, special characters can be used to give the appearance of graphics - this feature is called Pseudo-Graphics Mode or 'PG' for short. This section explains how PG mode works and what features and limitations it has.
The image below shows the pixels that make up an 8x16 character, each small square is a VGA-sized pixel. In PG mode, the character is broken into 4x4 blocks represented by the orange 4x4 and white 4x4 squares. These are the points that can be plotted in PG mode. Since there are 2 points making up the width of a single character and 4 points making up the height, it follows that the total screen resolution in PG mode is 160x120 points.
The 8 points within a character are numbered 0-7 and we will refer to this later to explain how PG mode is implemented in software.
Since all PG drawing is done with characters, the terminal doesn't have to be put into a different mode - PG drawing characters can co-exist with normal ASCII characters. Each ASCII or PG character can be any colour but the points that make up a PG character will all be the same colour. So if a red line crosses a green line, the character at the intersection will be either red or green which means that some of the other colour line may look wrong. It is up to the application to choose the colour scheme carefully and ensure adjacent points with different colours are not part of the same character.
When the software receives a request to plot a PG point or draw a PG line/shape, it first calculates the character position that contains the point to be plotted and reads the existing character at that position. If it is a regular ASCII character, it is replaced by a PG character, but if it already contains a PG character, the new request is merged with the old character and the replacement will contain the new point as well as the old points.
For this to work, every possible combination of eight PG points must be available as a character which is 256 PG characters. The software could generate a new custom character each time but this would reduce the number available to the user and loading the font RAM is a relatively slow process which must be done during VSYNC to avoid visible effects. Finding room for 256 characters is tricky - the G0 font contains all the regular ASCII characters which we need to keep so we store them in the G1 font as follows...
This gives us enough space for 128 PG characters. Character 0x00 contains a blank character, character 0x01 contains a character with the 16 pixels in point 0 set, character 0x02, has all point 1 set and so on in a binary pattern. The last character in the G0 set (127) has all points set except point 7. When the font RAMs are loaded at power up, the G1 set is loaded and an inverted version of the G1 set is generated and loaded for reverse video characters. This set contains all 128 combinations of the PG characters but with bit 7 set. The PG drawing software selects a reverse video character if it wants bit 7 set and a normal character if it wants bit 7 clear.
To merge an existing PG character with a new point to set, the existing character is read and its code (position in the G1 set) is converted to a code that represents its bit pattern by stacking the character ranges and inverting the pattern if it is a reverse video character. Then the new request is simply OR'ed with the existing bit pattern and the reverse process is used to calculate the replacement character.
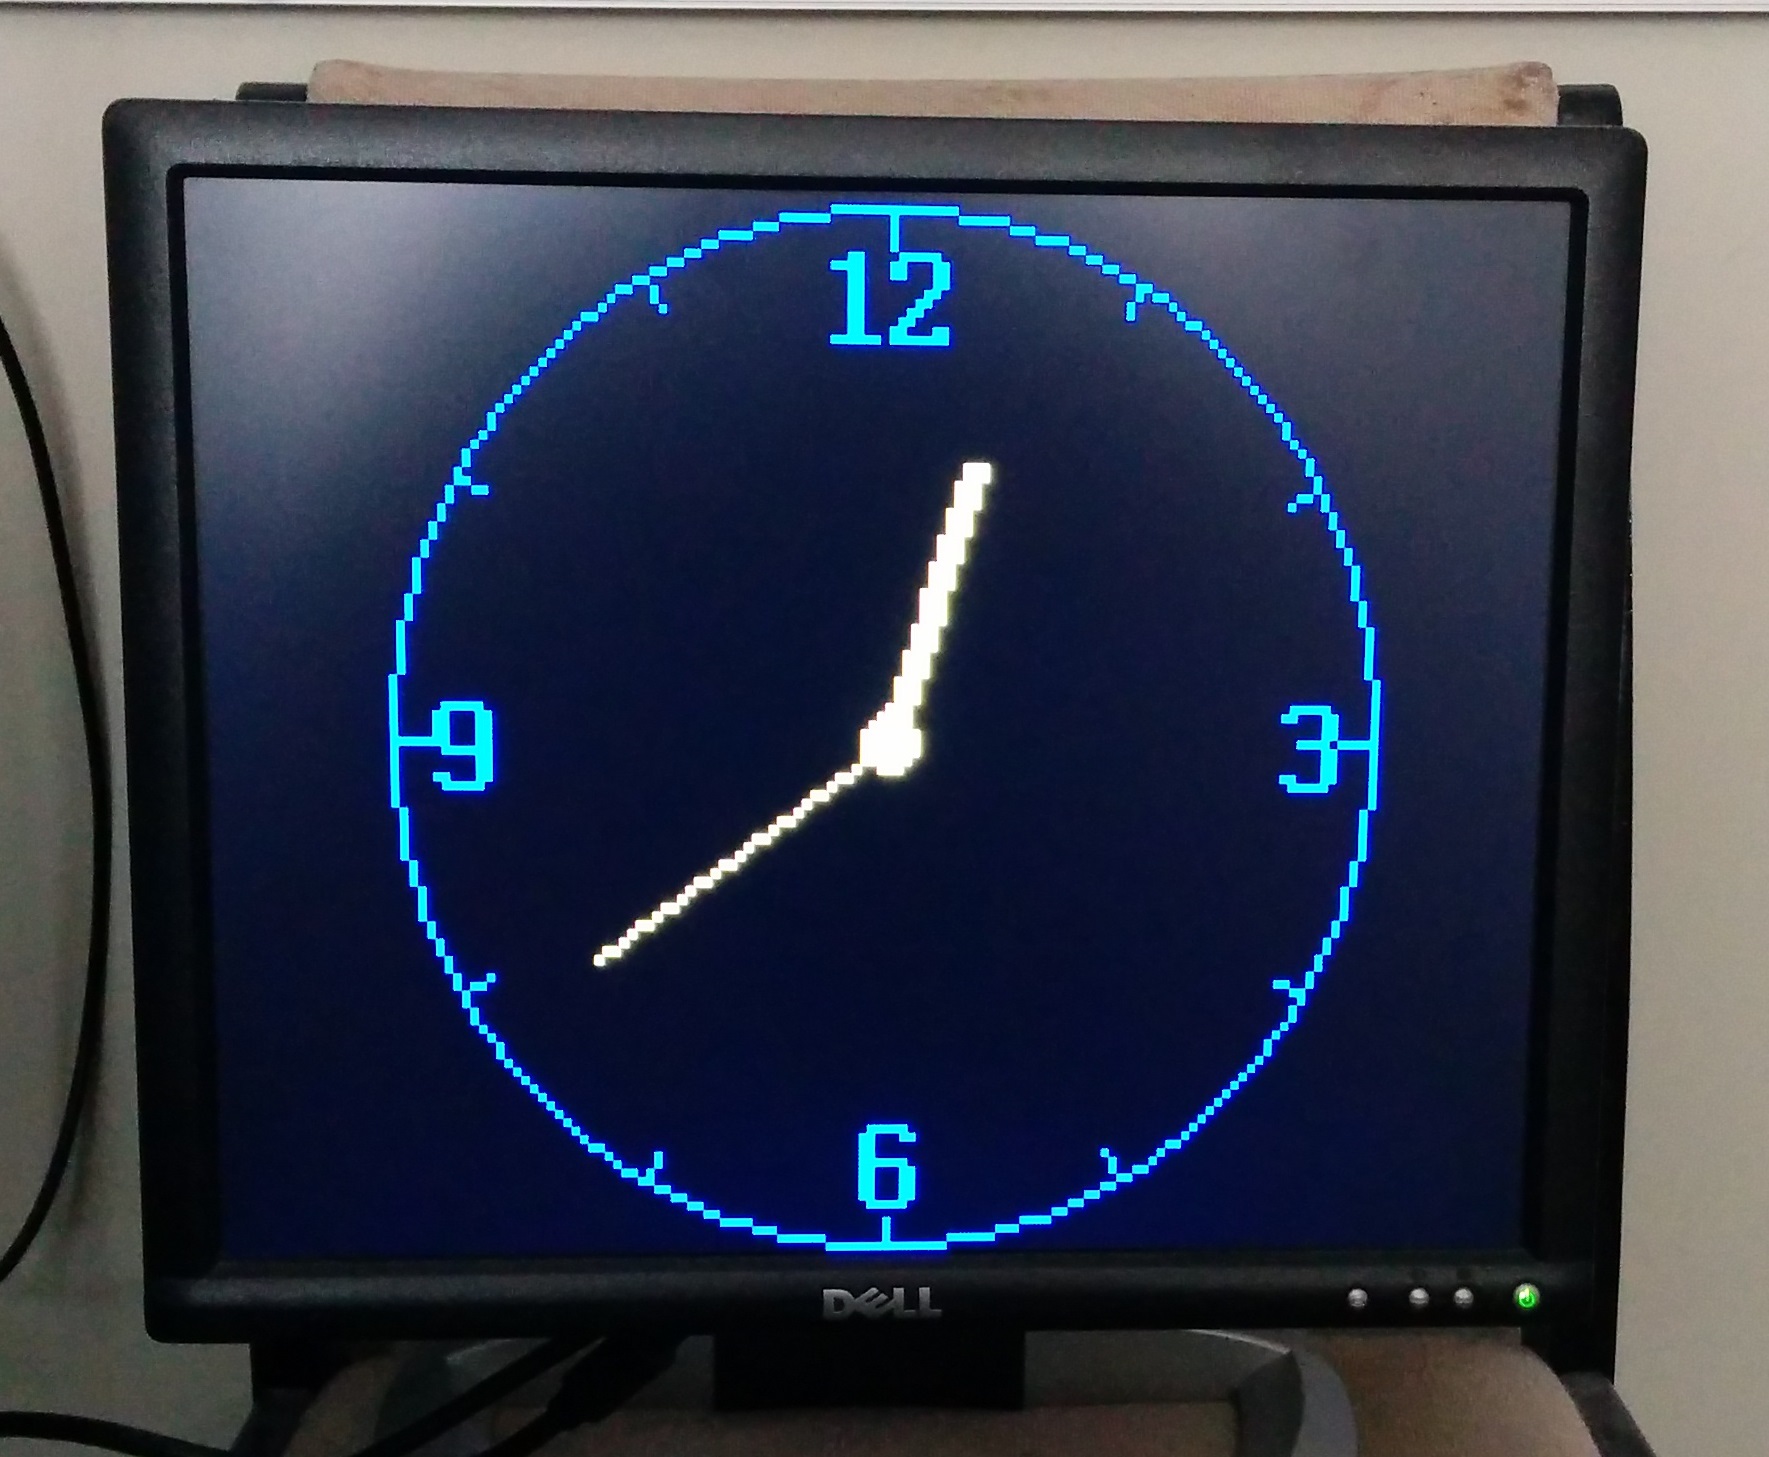
To speed up line drawing and particularly drawing filled shapes, a number of versions of the above are used that can set multiple bits within a character. Characters drawn in black are erased the same way. The photo below shows a clock drawn with PG characters. The face is made up of a PG open circle with PG characters for the numbers. The hands are drawn with PG lines which are removed by drawing them in black, then re-drawn in yellow to move the hands. The central circle is a filled circle shape.